Linear Clock: Solar
Linear Clock: Solar is now available for sale. Please visit my shop if you would like to purchase one for your space.
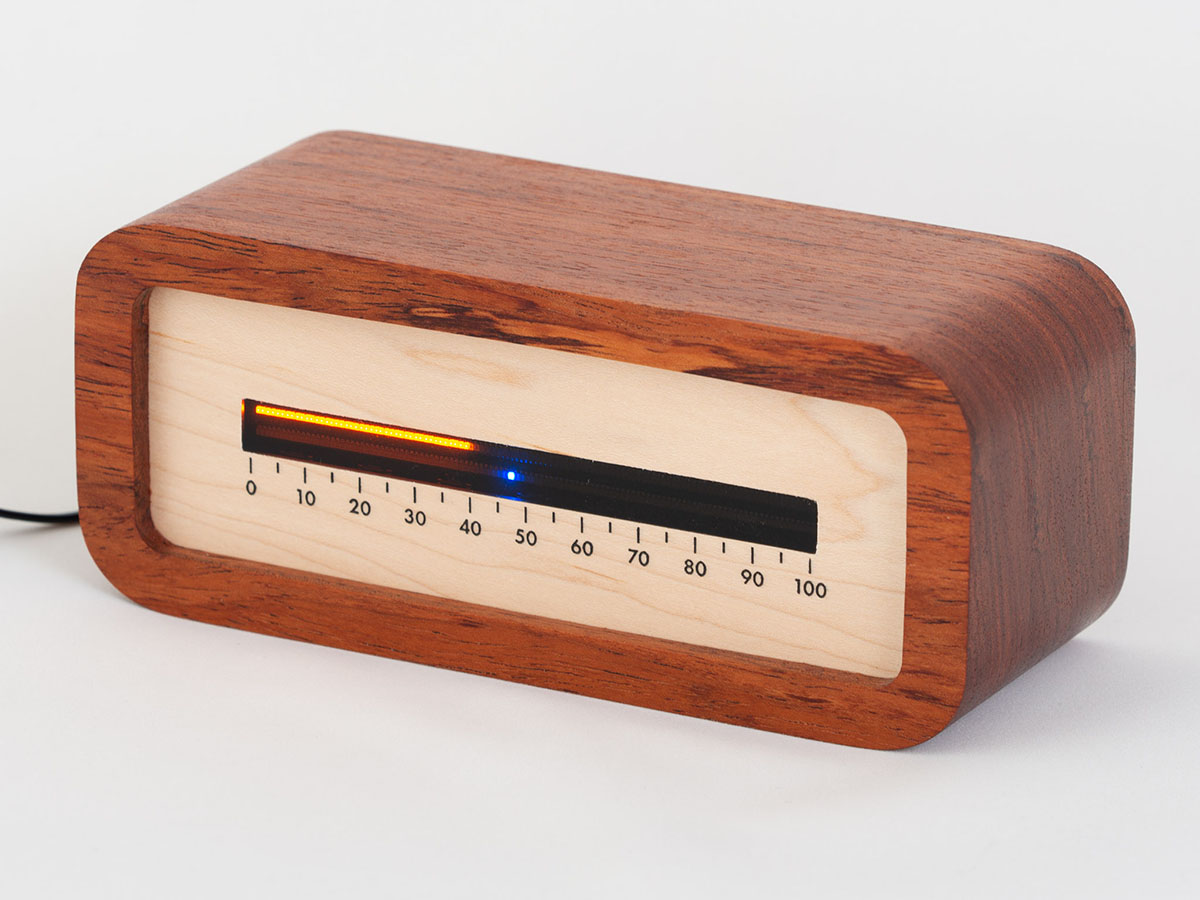
During 2020, the isolation of lockdowns distorted our sense of time, and I revisited a previous horological experiment of mine relating to how we express time, the linear clock. I designed and built a clock that uses satellite navigation and astronomy to show time as a progress bar measuring the percentage of the day elapsed since sunrise. A second indicator marks the time of sunset in blue.
The idea for a linear clock was inspired by my experience at Camp Grounded, a tech-free summer camp for adults. One of the rules of camp was to “leave time behind” — for a weekend, we put away watches, phones, and alarms, and measured time only by the sun and stars. An activity might last “5% of the day,” but nothing was scheduled by clocks, or counted in hours or minutes.
To carry this looser experience of time back into the everyday world, in 2018 I built a desk clock that used a bargraph Nixie tube to display time as a continuously growing progress bar. Along the way, the project became a tutorial in power electronics, custom PCB design, Bluetooth LE, and 3D printing. I didn’t study electrical engineering formally in university, and it was a deeply satisfying experience to feel like a student again, and then complete this project with a physical object in my hands.
However, something about its display didn’t feel right. By definition, a day begins at midnight, but it didn’t match my experience of a day to wake up early and have the clock tell me a quarter to a third of the day had already passed. I would have preferred to have something based on sunrise and sunset.
In the COVID lockdown of 2020, I had the time to revisit the project. Building on my previous experience, I designed and built a hardware and software device that uses a GNSS receiver to compute time relative to sunrise and sunset. Since it derives time and location from the satellite signal, it never needs to be set, or ever adjusted for daylight saving time. I also refined the physical design with a walnut and maple enclosure cut on a laser engraver and CNC router, and then finished by traditional woodshop techniques.
The sunset indicator was immediately interesting. Days are longer in the summer and shorter in the winter, but I never quantified it for myself. How might I plan my day differently with a clear indicator of the balance available between daytime and nighttime hours?
A year after testing the first prototype, the clock has changed my perspective on time and thinking of the day. I’ve become a bit of a morning person now, not wanting to sleep away perfectly good daylight hours. The sunset indicator at 60% in the summer beams with possibilities, and at 40% in the dead of winter is a reminder to make the best use of what you have.
Electronic design
My original linear clock used a bargraph Nixie tube. The new design requirement for a dual indicator, as well as the cost of adding a high-voltage DC-DC converter and sourcing IN-13 tubes (out of production for nearly 40 years), led me to abandon Nixie tubes in favor of LEDs. Discrete surface-mount LEDs are plentiful and cheap, but come with the challenge that assembling them on a circuit board, in a perfectly straight row with a tight pitch, would require the precision of machine placement. As it happened, JLCPCB, a Chinese PCB fabricator, began offering surface mount assembly services in 2019. While their service only has a limited library of parts, it’s perfectly suited to placing hundreds of LEDs on a board. The remaining parts I would assemble by hand. Traditional prototype assembly houses would normally charge thousands of dollars for a small prototype order, but now I could get partial assembly done for $3 per board, delivered a week after I placed the order. This design would not have been possible just a few years ago for a non-commercial project.
Constant-current shift register drivers are used to light the LEDs, which makes it possible to control an arbitrary number of LEDs with only a single data line. All that is required is to send the shift register a string of bits, for example, 10000001 to indicate the first and last LEDs should be lit. The shift register holds its state until new data is received, meaning the display does not need to be continually refreshed. After some research, I found the TLC5926 from Texas Instruments provided the right mix of features, controllability, and reasonable cost. It supports 16 outputs and has options for fixed (set by resistor) and configurable (set by software) current outputs, as well as PWM dimming. Each row of LEDs uses 112 indicators since I wanted at least 100 points of resolution and I rounded that up to the next multiple of 16. The TLC5926s are connected together in series, so to set the state of both rows, the microcontroller sends a string of 224 bits.
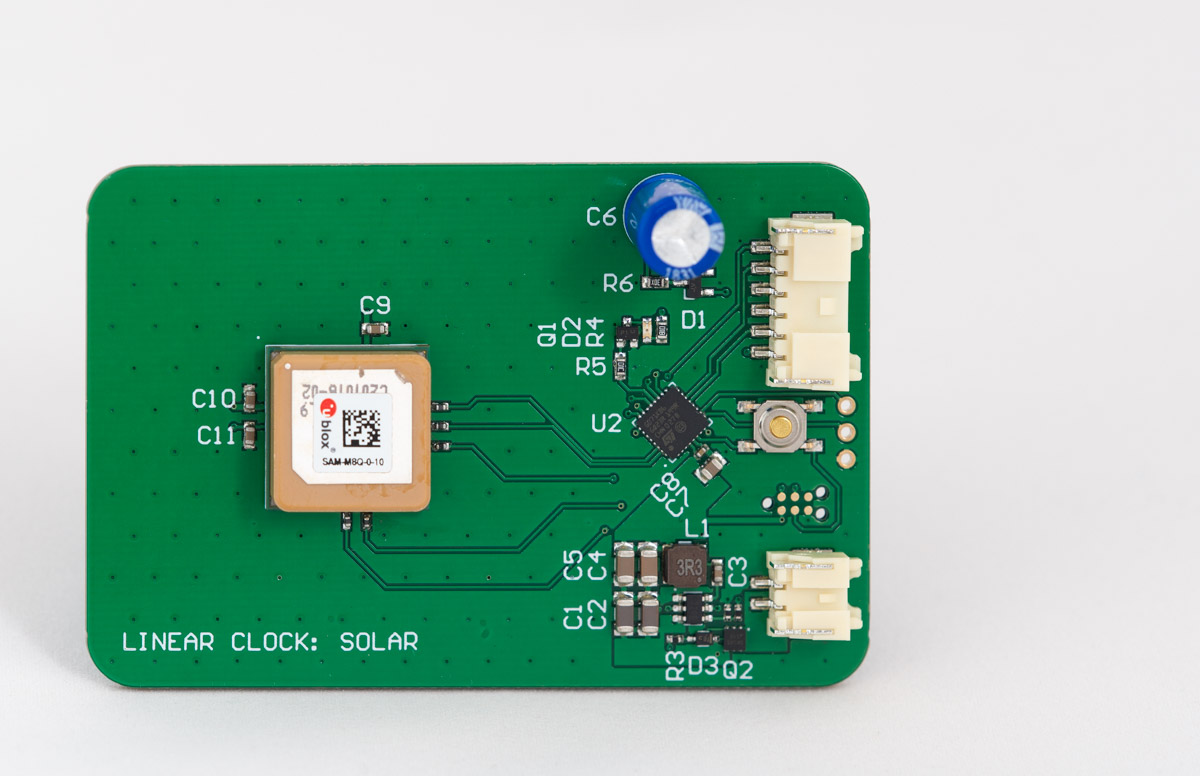

I split off the GNSS module and microcontroller to a separate board, because the GNSS module works best when mounted horizontally to point toward the sky. The module is the SAM-M8Q from u-blox and comes with an integrated patch antenna. It was a pleasure to prototype with this device; u-blox provides extensive documentation, and the module is easily configurable and uses an efficient binary protocol over I2C. The microcontroller only needs to perform the astronomical calculations and act as a I2C and SPI bus master, so I chose a part from the low-cost STM32G0 series. This is a microcontroller family I’m already familiar with, so it was easy to prototype on a Nucleo development board and then move to a custom board.
The rest of the main logic board is simple: connectors for power and data between the two boards, a small buck converter to provide regulated voltage, a supercapacitor backup to speed up satellite acquisition after the clock is briefly unplugged, and diagnostic ports and indicators for programming and debugging the microcontroller. The GNSS module sits in a large ground pour that is actually part of the antenna design.
Software design
I understood intuitively that if you know the date and time, and your position on Earth, you should be able to determine the relative position of the Sun, and when it will cross the horizon. But I’ve never taken an astronomy class, so the exact method to do this was something of a mystery. I relied on Astronomical Algorithms, 2nd edition, by Jean Meeus (now out-of-print) to understand this calculation.
At a high level, the Sun’s orbital elements are computed based on the date and time obtained by the GNSS. In the code, this is seen as several polynomials computed on the Julian date. These ephemerides are approximate solutions to the n-body problem of the motion of celestial bodies in our solar system. As such, they will eventually wander off true over time, but should remain reasonably accurate for several millennia. The rest of the computations are coordinate transformations, from the ecliptic to the equatorial coordinate system, and finally to the horizontal coordinate system of an observer on Earth at the latitude and longitude obtained from the GNSS. To keep the display at a comfortable brightness at night, LED output is smoothly adjusted during twilight periods based on the Sun’s elevation.
For practical reasons, the effects of altitude and terrain are not taken into effect. Meeus describes a simple altitude correction for use in computing sunrise and sunset times, but I found the altitude data from the SAM-M8Q was inaccurate and subject to a lot of drift. In extreme cases, the drift in the reported altitude might make the day progress bar go backwards. Also, since the calculations are done with the horizon at sea level, a person living on a mountain slope might have a different opinion on the time of sunrise and sunset.
Lastly, there are places on Earth where, for some part of the year, the Sun never rises or sets! I have never lived in a place with a polar day or midnight, and I’m not sure if a sun-based clock makes sense in those places and times. Nevertheless, the solution I used was to mark the beginning and end of the day at the point where the Sun is closest to the horizon. This makes the solution continuous, in the sense that a person observing the clock while moving north into the Arctic circle at certain times of the year would see the day progress bar advance normally, while the sunset indicator would move toward either 0 or 100 before vanishing altogether.
The overall structure of the clock’s firmware is very simple. After configuring the SAM-M8Q to send regular updates, it waits for an interrupt from the GNSS module, and then computes the day fraction based on the Sun’s position, and sends a sequence to the shift register drivers to turn the display LEDs on or off.
Enclosure design
I knew I wanted to build an enclosure out of wood. I was influenced by the industrial design of Braun appliances, from an exhibit on the work of Dieter Rams at San Francisco’s Museum of Modern Art. In my mind, I pictured a midcentury-style design with a contrasting walnut and maple elements.
The original Nixie tube linear clock used a 3D-printed enclosure I had produced in white plastic by Shapeways. This freed me to consider the design without thinking about how to manufacture the enclosure, but it was also expensive and time-consuming to have made.
I researched several possibilities to translate the design I had in mind into a feasible process for manufacturing. I considered bending a laminate board around a form in the shape of the outer frame. It turns out bending plywood with a tight radius is difficult and it would still have a seam. I also thought about starting with a solid block of wood and milling out the center, but very thick boards of hardwood are hard to source, and most end mills can cut 3/4” or 1” deep at most. Longer end mills are rare because they deflect more, leading to tool breakage or chatter on the part surface.
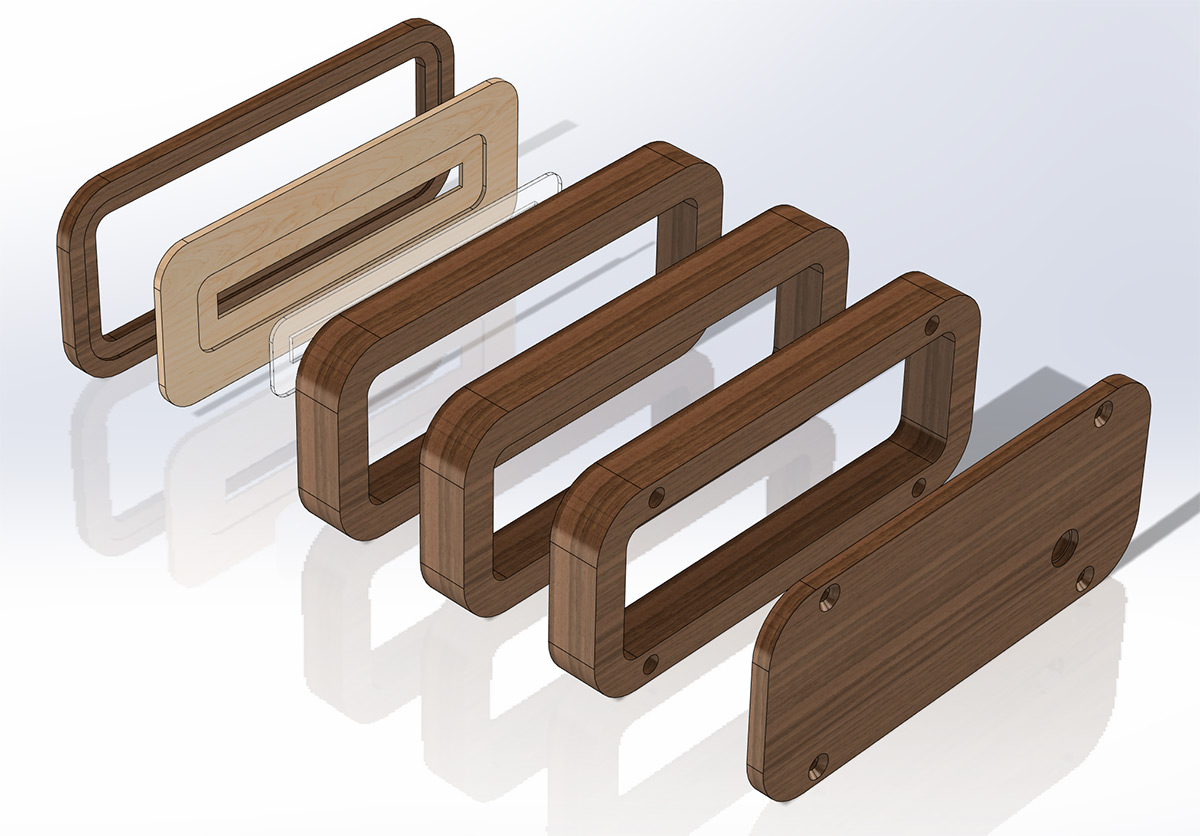
The method I chose was to cut multiple sections from 3/4” board planed from 4/4 lumber and glue them together. 4/4 hardwood lumber is easily available everywhere, and glue-up construction is a standard technique practiced in woodworking. The front face and plastic window were cut using a CO2 laser engraver, and then milled on a CNC router using a fixture.
In the initial prototype build, I cut the plastic window the same size as the cutout in the face. This made for a challenging assembly procedure because I had to glue the sides of the plastic window and cutout together, without any visible glue squeeze-out. To make the process foolproof, I changed the design to mill a shallow pocket around the cutout on the back of the face, and milled a larger acrylic window in the negative of this shape. Now I could glue these hidden surfaces together without having to worry about squeeze-out.
I originally designed the enclosure using Fusion 360, but after Autodesk removed many features from the personal version, I decided to give the community edition of Solidworks a try. Re-sketching the design from Fusion to Solidworks was a good tutorial, but the CAM side of the process was a different story. I liked the integrated CAM features of Fusion 360, but Solidworks’ built-in CAM option is best suited for metal milling only. I ended up exporting the CAD drawings from Solidworks to create toolpaths in vCarve, which was not a very integrated workflow, but it had one helpful benefit: vCarve could combine all the toolpaths for cutting the frame into one program. Instead of running a separate program for each of the three frame parts, and adjusting the machine zero in between, I could dimension a board of lumber to the right size, set the router zero once, and run a single program to get all five parts cut.
Finishing is the step where you get to see your hard work pay off. There’s something satisfying about watching the wood take a deep, rich color as the first coat of oil goes on. I used a tung oil finish for the frame, and a water-based polyurethane topcoat for the maple face. Once finished, the PCBs were fastened inside, and all the connection hardware installed.